


Showing posts with label baking. Show all posts
Showing posts with label baking. Show all posts
Tuesday, January 12
Chena Poda / Chenna Poda

Chena Poda is a very famous and delicious dessert from Orissa. I might have had it earlier , but the one I remember was having it at my DSIL home. She had prepared it while we visited them for holidays. I was overwhelmed by all her preparation and she told me it was actually very simple to make. Like even my BIL can make 😜 My hubby who is born and brought up in Orissa, relished his childhood memories while having it, so I did had to try it. And this is actully simple and easy recipe. Chenna poda is a delicious dessert popular in Odisha. Its made with chenna or
fresh paneer. The entire dish is baked and can also be called paneer cake or roasted cheese.

Ingredients:
For Chena poda


For Chena poda
Milk 2 litre or 250 grams Paneer (Indian Cottage Cheese)
Juice of 2 lemons
1/4 cup or 4 tablespoons Sugar
1
1/2 tablespoons Ghee
4 tbsp milk or whey water
2 tbsp Sooji (Semolina/ Rava)
1/2 tsp Cardamom Powder (Elaichi)
Cashew nuts choppen in big pieces
Raisins 2 tbsp
For caramelizing
Ghee 1tsp
Sugar 2-3 tsp

Method:
Add the milk in a pan and bring it to a boil. Lower the flame and add lemon juice. the milk will begin to curdle. Add more juice if it doesnt curdles completely.
Switch off the flame and drain the paneer with a muslin cloth. Wash it with water to remove any sour taste of lemon.
2. Take the fresh paneer or store brought one and crumble it well. Mash it well.
3. Add sugar and Semolina and mix it all well.
4. Mash it with a spoon or with hands till all the sugar dissolves and it is like a smooth dough consistency.
5. Slowly add the whey water or milk to make the cake battery consistency batter.
6. Add chopped cashews, raisins and cardamon powder.

Preparing the Pan:
Apply ghee at the base of the 6 inch pan. Add about 2-3 tsp of sugar and put the outside of the pan over direct flame. Keep rotating the pan over the heat , so as sugar starts melting and gets caramelized. Keep rotating the pan so as a thin layer of caramelized sugar is formed in the pan. Pan is ready.
Preheat the oven to 190 F . Add the prepared batter in the pan, tap it twice and bake the cottage cheeses cake for about 25-30 minutes, till the toothpick comes out clean and a light brown layer is formed at the top.
Once cooled, cut the cake into cubes and take it out of the baking pan
Tips:
1. Preparing the pan is not so easy and can be skipped, till we get an hand of it. Chena poda tastes equivalent good without it too.
Read more...
Sunday, May 31
Yogurt cake with Crumb topping

Staying at home during this COVID outbreak has aggravated everyone's itch for cooking and baking is top in the list of all the wonderful new chefs.
With no need to commute to and fro from office and no where else to go after my wfh has given me too a lot of time in hand. So I thought of trying new recipes. But to tell you the real reason, it was my 2 brats who are always looking around in kitchen for food. Their number of trips to kitchen, with a face back that there is nothing good there ( though I always have enough variety of food in my pantry) , which actually meant that they need something new.
So finally I am back in kitchen with my love for baking and here are the few new recipes. More to come
So finally I am back in kitchen with my love for baking and here are the few new recipes. More to come
Staring with something sweet.The beauty of this cake is its topping, sweet crunchy crumbs make this cake irresistible.

Ingredients:
Crump topping:
Plain flour - 1 1/2 cups (195 gms)
Firmly packed light brown sugar -3/4 cup (155 gms)
Powdered Cinnamon 1tsp
Salt 1/4 tsp
Unsalted butter, melted - 10 tbsp (140 gms)
Yogurt Cake:
All purpose flour - 1 2/3 cups (225 gms)
Baking powder - 1 tsp(4 gms)
Baking soda- 1/2 teaspoon (2 gms)
Salt 1/2 tsp(2 gms)
Powdered cinnamon -1/4 tsp
Instant coffee powder -1/2 tsp (optional)
Eggs -2 large
Oil - any flavorless -1/2 cup (120 ml/gms)
Greek Yogurt -3/4 cup (180 ml/gms) room temperature
Pure vanilla extract -1 tsp (4 gms)
Granulated white sugar -1 cup (200 gms)
Method:
1. Preheat your oven to 350 degrees F (180 degrees C)
2. Prepare the baking pan ( 8x8 inch) . Butter or spray with a non stick vegetable spray. Line the bottom of the pan with parchment paper.
Crumb Topping:
1. In a bowl add the flour, sugar, ground cinnamon and salt.
2. Then add the melted butter and mix it until all the dry ingredients are just moistened. I used my hand to do so as it was easier.
Yogurt Cake:
1. Take a large bowl and add flour, baking powder, baking soda, salt, ground cinnamon, and espresso powder (if using).
2. In another bowl beat the eggs with a whisk and then add oil, yogurt, and vanilla extract.
3. Stir in the sugar.
4. Add the wet ingredients to the flour mixture. Stir until just combined. the mixture would be sticky and a bit thick.
5. Add the batter into the prepared pan. Evenly scatter the crumb topping on top of the batter with your hand, braking lumps if any.
6. Press lightly so the crumbs adhere to the batter.
7. Place the oven rack in the center of the oven. Bake in preheated oven for about 40 - 45 minutes or until a skewer comes out clean.

Tips:
1. You can reduce the quantity of overall crumb topping, if you like less of it.
2. We can just make a plain yogurt cake, without topping. Just use a smaller pan.
Read more...
Saturday, February 17
Eggless walnut cake with coke

Having tried cakes with the full-proof never go wrong recipes of Rich Chocolate banana and Carrot cake, tried this egg less cake recipe from one of my gujju friend. She is great cook and actually loves cooking. Her recipes never fail me. And the best person to have a easy egg-less recipe is definitely her :)
She told me lots of variations too that can be done in the same recipe ( tried and tested by her). This cake is very heavy and filling to eat and after eating this, we don't feel like eating anything else. I think that's why my kids names it as cursed caked, so funny and weird. They just cant resist the temptation to eat it and after eating this they don't have any appetite left to eat anything else.
And the best thing I like about this cake is, its full of nuts, a healthier option to give to kids.

Ingredients :
All purpose self raising flour 2 cups
Milkmaid 1 tin ( 397 gms)
Butter 125 gm
Baking soda 1 tsp
Khane ka soda 1 tsp
Dry fruits mix 250 gms
Coke 125 ml
Vanilla essence 1 tsp
Method:
1. Preheat the oven to 200 degree Celsius
2. Grease a 6 x6 inch baking dish and set aside.
3. Take flour , baking soda and khane ka soda and mix well. Pass it through sieve 3 times so as it mixes completely .
4. Add softened butter in a deep bottom bowl and whisk it with an hand mixer or electric mixer for 2-3 minutes, until soft and frothy
5. Add milkmaid and mix well
6. Add the dry fruits ( I used roasted and chopped walnuts)
7. Add the issuance and finally add coke.
8. Pour the batter in the prepared baking dish and bake for 30-40 minutes, until the skewer comes out clean .
9. Let it be in oven, a standby time of 10-12 minutes and we are done.
You can see how much soft and spongy the cake looks. These were the only slices left in the whole cake, that was left for me to pack and store, rest all was gone directly from the baking dish.

Tips :
1. Keep the nuts of choice ready , roasted and chopped in advance.
2. We can have variations by using fanta, instead of coke and adding orange Zest , orange essence to have orange cake.
Read more...
Tuesday, February 13
Rock Cake or Rock Buns

I stumbled upon these when when my DS, who is now in lower secondary, brought a few buns that he baked in school. I was amazed that he can do some baking/ cooking on his own, as at home he rarely steps in kitchen. :P
Okies, so we tried them and liked them instantly. So I asked him to bake a fresh batch at home as well. " Ohh, its very simple recipe, lets make it " . He took out a printout of the recipe with the ingredients and its amount and viola, there was no butter/ margarine in the list. Other ingredients were sure out of proportion as well. :(

But since we loved the buns and he insisted the recipe is simple and need not to be so proportionate, I decided to google the recipe and try it. Upon searching I came to know that all lower secondary kids are taught to make rock buns to demonstrate the rub-in method. There is actually no specifics to the amount / ingredients used. Its depends upon your taste buds how you want to it soft , hard, crunchy, nutty ....
They got there name, as they are rough looking and hence dont soomthen them down.Rock buns are a specific type of pastry, distinguished by the hard, crust-like texture and sweet taste. Good Old Rock Cakes These were once economy cakes, not too expensive, providing cake for large families.
Ingredients:
200 gms ( 1 1/3 cup) All purpose flour
75-80 gms Melted Butter
75 gms Sugar
1 tsp Baking Powder
1/2 tsp Salt
1 Egg
75 gms Berries/ Raisins
1 Tbsp Milk
1tsp Vanilla essence
Method:
1. Preheat the oven to 200°C/400°F and grease the baking tray
2. Sieve the flour in a large bowl
3. Pour melted butter over it and with hands rub the butter over the flour. All grains of the flour should be coated with butter and resemble breadcrumbs
4. Add sugar and dried fruit mix.
5. Finally add egg, milk , vanilla essence and mix thoroughly.
6. Using two forks, lift up small portions of the mixture and place on the baking sheet more than an inch apart.
7. Place the tray in the preheated oven for 10-15 minutes until golden brown. Leave it inside oven for about five more minutes, then transfer to a wire tray to cool.
Tips :
1.The buns need to be rough looking, do not smooth them down while placing them in baking tray
2. You may vary the ingredients / proportion , depending upon you like harder or softer buns.
Read more...
Thursday, January 14
Healthy Oatmeal cookies

So eventually thought of baking some cookies, as my previous attempt with baking Choco chip cookies was not so exciting due to the older oven with its round tray :( . So I was sure , my new oven would be far better and we wont be disappointed with the results . And viola, it was a breeze making these cookies. The faster I made them, even faster all the cookies were gone.

Ingredients:
Dry Ingredients:
3/4 cup (105 gm) all purpose flour
1/2 tsp baking soda
1/2 tsp salt
1/2 tsp ground cinnamon (optional)
3/4 cup (170 gm) unsalted butter, room temperature
1 cup (210 gm) packed brown sugar
1 large egg
1 tsp vanilla extract
3 cups (260 gm) old-fashioned rolled oats
1 cup walnuts or pecans (optional)
1 cup white or dark chocolate chips (optional)
Method:
1. Toast the nuts and then chop into pieces after its cooled . Set aside.
2. Whisk together all the dry ingredients in a bowl. Set aside.
3. In the bowl of your electric mixer (or with a hand mixer), beat the butter until creamy and smooth (about 2 - 3 minutes).
4. Add sugar and mix for another 2-3 minutes.
5. Add the egg and vanilla extract and beat to combine.
6. Add the dry ingredients and beat until incorporated.
7. Finally stir in the nuts, oats, and dried cranberries or chocolate chips.
Now our batter is ready. Refrigerate for 1-2 hours , so that the butter hardens back.
Preheat oven to 190 degree C. Line baking sheet with parchment paper.
Use a spoon or a ice-cream scooper to scoop a spoonful of the batter in the baking sheet about 2 inches apart.
With your fingers slightly shape and flatten the cookies to be about 1/2 inch thick.
Bake the cookies for about 10 - 12 minutes or until it gets a light golden brown color along the edges and is still soft and a little wet at the center.
Remove from oven and let it cool a few minutes and then transfer them to a wire rack to cool.
Tips:
1. We ca replace chocolate chips with dried cranberries or raisins o make it even more healthier.
2. If we don't have unsalted butter, use salted butter and omit the salt added n dry ingredients.
3. Batter can be mixed and kept in refrigerator ahead of time.
4. If we need to bake the cookies in batches, keep the batter back in refrigerator, else the cookies flatten a lot gets cooked really fast ( may burn)
Read more...
Wednesday, July 13
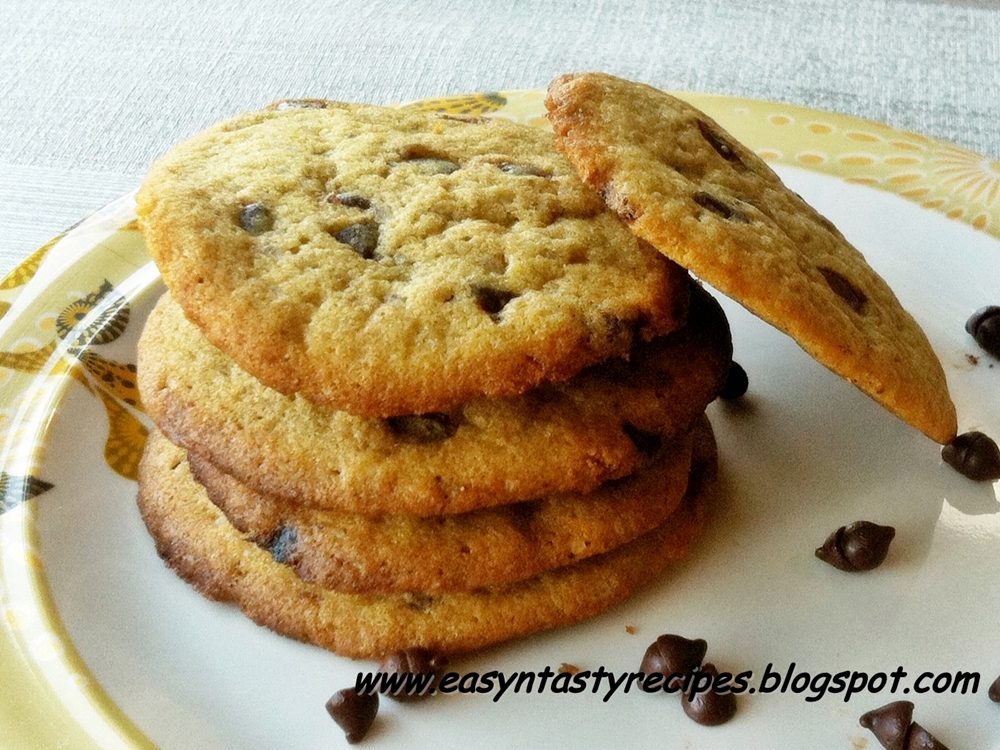
Choco Chip Cookies

The recipe makes about 40; 3 inch cookies. I did made half batch only, as this was my first attempt at baking cookies, so made 20 only. Also I did baked it in 3 small batches, out of which one batch got overcooked, and thus got burned at the bottom :(
The recipe is very easy and it takes very little time to bake these cookies. Its one of the easiest, most delicious and a basic choco chip cookie recipe. It uses a combination of white and brown sugars, producing a rich and chewy cookies with caramalised edges.

1 cup (226 grams) unsalted butter @ room temperature
3/4 cup (160 grams) firmly packed brown sugar
3/4 cup (150 grams) granulated white sugar
2 eggs large
1 1/2 tsp vanilla extract
2 1/4 cups (295 grams) all-purpose flour
1 tsp baking soda
1/2 teaspoon salt
1 1/2 cups (270 grams) semisweet chocolate chips
Method:
Preheat oven to 190 degree C (375 degree F). In a bowl, beat the butter until smooth and creamy. Add both the white and brown sugars and beat. Then beat in eggs, slowly one at a time. Add Vanilla extract and mix. In a separate bowl mix flour, salt and baking soda and then add this to the egg mixture and beat well. You can use a hand mixer or a kitchen aid as the dough tends to be a bit stiff at this stage. Lastly fold in choco chips and make sure they are evenly dispersed so we have enough chocolate in each cookie. The dough is now ready.
Now before baking the dough needs to be a bit stiff, if you find the dough a bit soft, refrigerate until firm (upto 2 hours) Drop dough on a lined baking sheet by 2 rounded tablespoon about 2 inches apart . The chocolate chip cookies need to be this far apart because the dough spreads during cooking. Bake for about 10-12 minutes or untill golden brown on edges.At this stage the cookie may look a bit uncooked but they will finish cooking through out of the oven.
As for my oven i did baked it in cookie mode for 10 minutes. It has a auto preheat and after preheating cookie balls in a parchement paper along with the tray needs to be placed inside the oven. Finally cool on a wire rack completely before storing as the cookies are very soft when hot.
If you are using kitchen aid, better use the butter still in quite firm state, though not cold, and thereby aviding the need to refrigerate it. Just take it out from fridge and microwave it for 10- 15 sec.
You can use a icecream scoop for dropping in the small balls of dough. Its very convinient and mess free.
You can also add about 1 cup (100 grams) walnuts or pecans, coarsely chopped after adding chocolate chips.
Also, you can make balls and freeze them for future. Just bake the frozen balls directly, adjusting the time a little more.
Read more...
Tuesday, June 28
Chocolate banana cake

Now after baking something tried and tested (nankhatai's), as my confidence grew; i thought of baking a cake. While searching for the recipe; i was looking for something healthy, with easy to find ingredients and minimal effort. And then i got this one . The recipe looked very easy and all the ingredients i did had at home. This one is a moist, sweet and healthy banana cake, and really very chocolaty one too.
The recipe uses a simple concept of 2 bowls, one for wet ingredients and the other for dry ones.
All the ingredients are just the same as from source,i.e, joyofbaking, its just that it was a big cake, and so i just exactly halved every ingredient for my smaller version. As we did cut the cake in the evening, and everyone was ready to eat..snaps didn't came out so nice.. But cake really tasted very yummy and was really moist. Just perfect. The best banana cake recipe.

Ingredients:
DRY:
Granulated white sugar 2 cups (400 grams)
All purpose flour 1 3/4 cups (245 grams)
Unsweetened cocoa powder 3/4 cup(75 grams)
Baking powder 1/2 teaspoons
Baking Soda 1 1/2 teaspoons
Salt 1/2 teaspoon
WET:
Eggs 2 large
Ripe bananas 1 cup mashed(about 2 medium ones)
Warm water 1 cup (240 ml)
Milk 1/2 cup (120 ml)
Oil 1/2 cup (120 ml) (any flavorless oil)
Pure vanilla extract 1 1/2 teaspoons

Method:
Preheat the oven to 350 degree F. Place the rack in the centre of the oven.
In a bowl mix together all the dry ingredients, and sieve it 2 -3 times with a sieve.
In another bowl mix all the wet ingredients and mix thoroughly.
Pour the wet mix over the dry one slowly and mix nicely.
The batter is ready; it should be quite thin in consistency, easy pouring one.
Pour the batter in a pre greased baking pan, and bake it for about 35-40 minutes.
Do check with a skewer , if inserted in center comes out clean , its done.
Remove it from the oven and let it cool before taking it out from the pan.

Tips:
Never open the oven in between, at-least in the starting 25-30 minutes.
Read more...
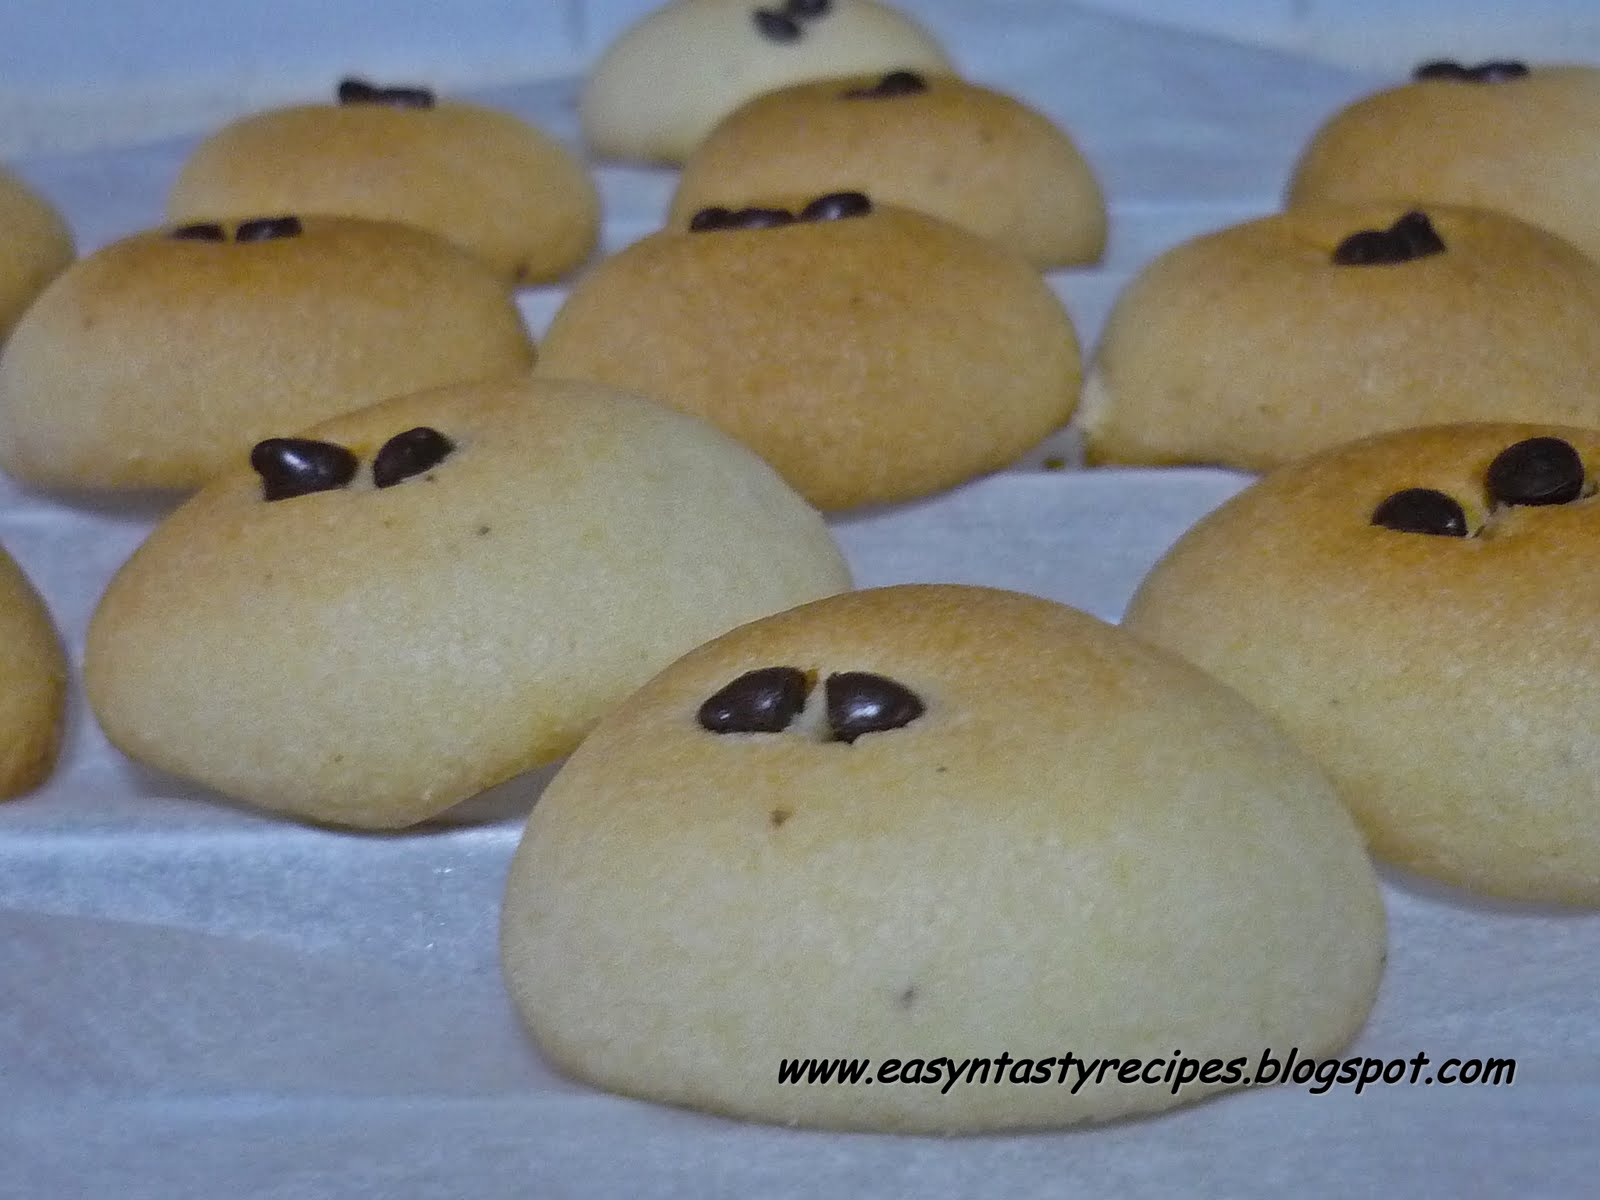
Friday, June 24
Nankhatai, Indian eggless cookie

I wanted to try baking for a long long time and finally ventured into it, when my new Sharp Convection oven finally came into my life (read house). The first thing that i tried baking were the traditional nankhatai's, the one's as seen in my chilhood, my mom and my elder sis baking, and eventually its aroma filling the whole house. And voila, my first attempt at baking was succesful. The recipe is indeed very simple and easy. My mom used to make a small cross in between and then press a cubed red cherry nut, which i didn't had,so i just pressed some choco chip instead, giving it a more cookie like look...
For others who do not know about Nankhatai, can say its a eggless indian biscuit.
Ingredients:
Unsalted Butter –1/2 cup,at room temperature
Powdered Sugar 1/2 cup
All Purpose Flour (Maida) 1 cup
Nutmeg Powder 1/4 tsp
Cardamom Powder 1/4 tsp
Baking Powder 1/4 tsp
Salt 1/8 tsp
Method:
Preheat oven to 350 degress F.
Combine softened butter and sugar slowly until mixture is light and creamy.
Then add Nutmeg Powder and Cardamom Powder and mix well.
In a separate bowl, sift all purpose flour with baking powder and salt and then slowly
combine flour mixture (little at a time) with butter mixture to form a soft dough.
Wrap dough in plastic wrap and leave for 15-20 minutes.
Knead dough once again and divide into 12 portions of the size of tennis ball and roll without any cracks.
Press lightly between the palms, can put a small cross in the centre and then press choco chips, or cherry or chopped almonds and pistachios
Put Nan khatai on a lightly greased cookie sheet leaving enough space between dough balls and
bake on the middle rack for 20-25 minutes.
Remove from oven and let it cool completely before storing in an air tight container at room temperature.
Tips:
Nankhatai is meant to be white, so do not let it get brown and adjust the time of baking.
If you don't have unsalted butter,you can used any salted one like amul butter, and omit addition of salt.
You can also omit the addition of salt altogether.
Read more...
Friday, March 28
Carrot Cake

For some time back, i was trying to make a cake in the microwave, but all resulted in a flop show,(some were dry, others don't puffed up) Finally i found this recipe and it came out very really well. Originally this was also meant to made in the conventional oven,as in my friends recipe(and like my all other recipes, that i used to make long back), but i did microwaved it,and thanx god, finally got good results...
Ingredients:
1 cup (100 grams) pecans or walnuts, toasted and coarsely chopped
2 1/2 cups finely grated(340 grams) raw carrots
2 cups (280 grams) all-purpose flour
1 teaspoon baking soda
1 1/2 teaspoons baking powder
1/2 teaspoon salt
1 1/2 teaspoons ground cinnamon
4 large eggs
1 1/2 cups (300 grams) granulated white sugar
1 cup (240 ml) sunflower, vegetable or canola oil
2 teaspoons pure vanilla extract
Method:
Preheat oven to 350 degrees F (180 degrees C) and place rack in center of oven. Butter or spray two - 9 x 2 inch (23 x 5 cm) cake pans and line the bottoms of the pans with a circle of parchment paper.
Toast the pecans or walnuts for about 8 minutes or until lightly browned and fragrant. Let cool and then chop coarsely.
Peel and finely grate the carrots. Set aside.
In a separate bowl whisk together the flour, baking soda, baking powder, salt, and ground cinnamon. Set aside.
In bowl of electric mixer (or with a hand mixer), beat the eggs until frothy (about 1 minute). Gradually add the sugar and beat until the batter is thick and light colored (about 3 - 4 minutes). Add the oil in a steady stream and then beat in the vanilla extract. Add the flour mixture and beat just until incorporated. With a large rubber spatula fold in the grated carrots and chopped nuts. Evenly divide the batter between the two prepared pans and bake 25 to 30 minutes or until a toothpick inserted in the center comes out clean.
Remove from oven and let cool on a wire rack. After about 5 -10 minutes invert the cakes onto the wire rack, remove the pans and parchment paper, and then cool completely.
If using microwave oven, cook the cake for about 7 minutes, in 70% power , and standing time of about 10 minutes.
Also add 1 Tbsp cocco powder, to get the brown effect.
Cake is ready..
This is my entry for MEC :Cakes
Update: I made this cake in microwave , and then tried my hands at icing for the first time. Can check it out here.
Read more...
Subscribe to:
Posts (Atom)


